The Gap Upper North
From South Wales Bouldering Guide Wiki
(Difference between revisions)
| Line 32: | Line 32: | ||
#'''F6a / V2''' Sitting start as for problem 2, climb to the break, then move right to finish as for problem 3. (V2 / Font 6a) Kevin Hughes | #'''F6a / V2''' Sitting start as for problem 2, climb to the break, then move right to finish as for problem 3. (V2 / Font 6a) Kevin Hughes | ||
| − | [[The Gap Upper North#|Top]] | + | [[The Gap Upper North#top|Top]] |
| Line 45: | Line 45: | ||
#'''5b''' SS. Directly up prow. Excellent. Chas Ryder 4.6.02 | #'''5b''' SS. Directly up prow. Excellent. Chas Ryder 4.6.02 | ||
| − | [[The Gap Upper North|Top]] | + | [[The Gap Upper North#top|Top]] |
| Line 58: | Line 58: | ||
#'''5a''' SS on left | #'''5a''' SS on left | ||
| − | [[The Gap Upper North|Top]] | + | [[The Gap Upper North#top|Top]] |
| Line 71: | Line 71: | ||
#Right arete | #Right arete | ||
| − | [[The Gap Upper North|Top]] | + | [[The Gap Upper North#top|Top]] |
==Prow 2== | ==Prow 2== | ||
| Line 83: | Line 83: | ||
#'''5a+''' Wall to left again. Chas Ryder 4.6.02 | #'''5a+''' Wall to left again. Chas Ryder 4.6.02 | ||
| + | [[The Gap Upper North#top|Top]] | ||
==Comments== | ==Comments== | ||
<br> | <br> | ||
<discussion /> | <discussion /> | ||
Latest revision as of 19:39, 7 June 2011
Back to The Gap
Contents |
Description
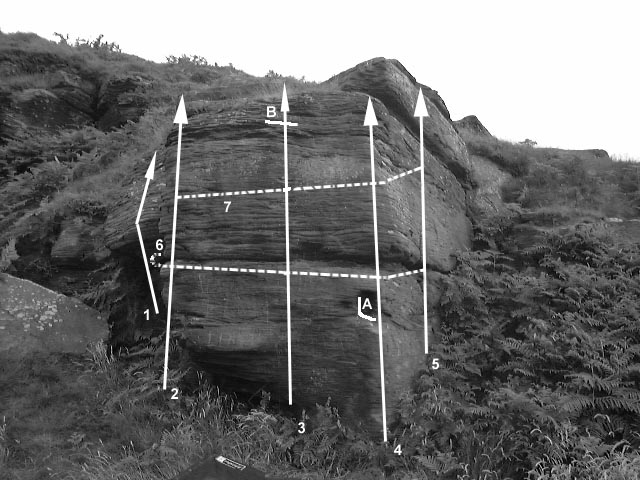
This area lays just north of the actual cap and holds more bouldering that you'd think at first glance. Below shows a picture of the area to assist with locating the different areas. These different are listed on this page, to jump straight to a specific area one can either click on the list below or click on the relevent area on the picture.
Square Wall
Problems
- 5b SS under the smaller buttress to the left, pulling over onto the slab TOF
- 5a SS climb the left arete of the square buttress TOF
- 6b/V3 SS and climb the middle of the buttress TOF. V3 .
- 5c+ An easier variation can be done by starting with the hands in the break climb the middle of the buttress TOF
- 5c Start at obvious pocket, climb arete with interest
- 6a Climb the face
- Start around the left arete and traverse along the break finished up problem 5
- 6b/c Start as for problem 2 and traverse right half way between the break and the top, continue with difficulty only using the sloper on the arete finishing up problem 5 TOF
- Dyno from A to B
- F6a / V2 Sitting start as for problem 2, climb to the break, then move right to finish as for problem 3. (V2 / Font 6a) Kevin Hughes
Prow 1
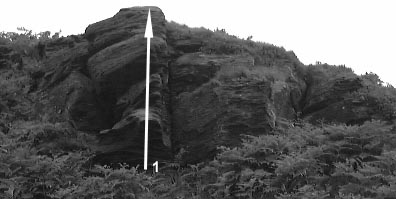
Left of the Square Wall and slightly up is an obvious prow/arete.
Problem
- 5b SS. Directly up prow. Excellent. Chas Ryder 4.6.02
Double Block
Higher up the hillside to the left is a double block.
Problems
- 5a SS over arete on right
- 5a SS in middle using hidden undercut.
- 5a SS on left
EPW - Easy Pleasant Wall
To left of this is a small wall which gives three easy but pleasant problems.
Problems
- Left arete
- Wall to right
- Right arete
Prow 2
Below this and just above the path that leads to The Gap is Prow 2
Problems
- 5a+ Prow 2. the prow direct. Good Chas Ryder 4.6.02
- 5a The wall to the left Chas Ryder 4.6.02
- 5a+ Wall to left again. Chas Ryder 4.6.02
Comments
You need JavaScript enabled for viewing comments
| powered by commenterra | Recent comments |


